I think you will agree with me if I say, concrete is one of the major construction material worldwide.
To have a clear idea about the amount of concrete used every year, we may have a look at the following survey report.

Wait! why we are discussing concrete consumption in the slump test article!
Why does this matter?
It matters because concrete is a mixture and slump test result is a direct indication of concrete mixture quality. It is the best way to comment on the quality of fresh cement on site.
In this article, we have focused to enlighten you with all the necessary information on slump test like definition, available international standards, pieces of equipment you will need to perform a slump test.
And more importantly, the step-by-step procedure of slump test followed by the list of cautions during the test and way to measure the workability from the test result.
Concrete Slump Test
The concrete slump test is an on-the-spot test to determine the consistency as well as workability of fresh concrete. This test plays a vital role in ensuring immediate concrete quality in a construction project. It is used almost in every construction sites.
The slump test is very simple and easy to handle. It also demands comparatively less equipment and can be done in a short period of time. These advantages of slump test have made it very popular all over the world. In the slump test, workability of concrete is not measured directly. Instead, consistency of concrete is measured which gives a general idea about the workability condition of concrete mix.
{adselite}
Concrete Slump Test International Standard
Various international codes have specific testing standards for concrete slump test. These standards specify methods, equipment for determining the consistency of fresh concrete by the slump test. For acceptance and reliability, It is essential to maintain strict compliance with these standards during the slump test for concrete. The standards for the concrete slump test are followings.
- American Society for Testing and Materials (ASTM): ASTM slump test standards are ASTM C 143, ASTM C143M.
- The American Association of State Highway and Transportation Officials (AASHTO): AASHTO slump test standards are AASHTO T119, AASHTO BS1881.
- British & European standard: British & European slump test standard is BS EN 12350-2.
- Indian standard: IS 1199 – 1959
Concrete Slump Test Equipment
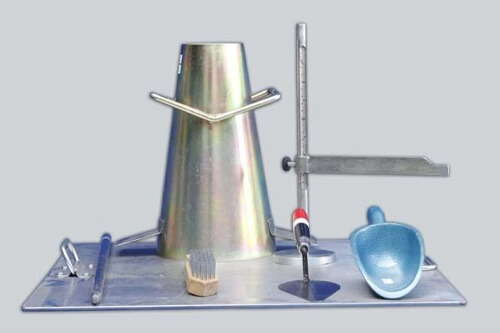
Slump test requires some equipment to perform the test. One can easily find these test kit set in the market. The test equipment must comply with the standards mentioned above. The equipment mainly used for slump test are followings.

- Mould: Shape of the mould is a frustum of a cone. The cone is known as slump cone or Abrams cone. Slump cone is made of steel, plastic, etc. Its height is 12 inches (30 cm). The diameter of the base opening is 8 inches (20 cm) and the top opening is 4 inches (10 cm).
- Base plate: Base plate may be made of Aluminum, polymer, steel, etc. It may be equipped with a holding attachment.
- Tamping rod: Temping rod used in the slump test is made of steel. Tamping Rod is usually 24" long and has a diameter of 5/8" diameter. Temping rod used in the slump test is made of steel. Tamping Rod is usually 24" long and has a diameter of 5/8" diameter.
- Tape measure: Standard tap should be used for measurement.
Concrete Slump Test Procedure
Step 1
Firstly, the internal surface of the mould is cleaned carefully. Oil can be applied on the surface.
Step 2
The mould is then placed on a base plate. The base plate should be clean, smooth, horizontal and non-porous.
Step 3
The mould is filled with fresh concrete in three layers. Each layer is tamped 25 times with a steel rod. The diameter of this steel rod is 5⁄8 inch. The rod is rounded at the ends. The tamping should be done uniformly.
Step 4
After filling the mould, excess concrete should be removed and the surface should be leveled. When the mould is filled with fresh concrete, the base of the mould is held firmly by handles.
Step 5
Then the mould is lifted gently in the vertical direction and then unsupported concrete will slump. The decrease in height at the center point is measured to nearest 5mm or 0.25 inch and it is known as ‘slump’.
Cautions Required During Concrete Slump Test
To get the proper result, some cautions must be taken during the test. Following are the list of major caution that can be maintained.
- Inside of the mould and base should be moistened before every test. It is necessary to reduce surface friction.
- Prior to lifting mould, the area around the base of the cone should be cleaned from concrete which may be dropped accidentally.
- The mould and base-plate should be non-porous.
- This test should be performed in a place free of vibration or shocks.
- The concrete sample should be very fresh, the delay must be avoided and the test should be done just after mixing.
Measurement of workability from the Slump Test
If shear slump or collapse slump occurs, the test should be repeated. We can get the result from the only true slump. We can classify the result within some ranges according to the slump value.
- Very low workability: slump value 0-25mm or 0-1 inch
- Low workability: slump value 25-50mm or 1-2 inch
- Medium workability: slump value 50-100mm or 2-4 inch
- High workability: slump value 100-175mm or 4-7 inch
According to 'Fresh Concrete' by P. Bartos, slump results can be classified as given below:
- No slump: slump value 0 mm or 0 inch
- Very Low: sump value 5-10 mm or 0.25-0.5 inch
- Low: sump value 15-30 mm or 0.75-1.25 inch
- Medium: sump value 35-75 mm or 1.5-3 inch
- High: sump value 80-155 mm or 3.25-6 inch
- Very High: sump vaue180 mm or 6.25 inch to collapse
According to European Standard ENV 206: 1992, workability is classified in 4 categories of S1, S2, S3, and S4. Slump ranges are:
- S1: 10-40 mm
- S2: 50-90 mm
- S3: 100-150 mm
- S4: more than 160 mm
Though there are different types of workability classification, the main rule is that low slump value indicates less workability and high sump value indicates high workability.

